Launching your new website can seem like a huge hurdle, but Hostinger makes it incredibly simple. If you want a reliable, step-by-step way to launch your site, you’re in the right place.
I will show you how to set up your website using 3 different methods so you can choose the one that you are most comfortable with. In under ten minutes you’ll have a fully functional site ready to show the world. Let’s get your online presence started today.
What You Need Before Installing WordPress
You need a few essentials in place before launching your site. Having these ready prevents technical delays.
1. Web Hosting
You need a reliable hosting plan to store your website files. Hostinger offers tailored packages, but for most new sites, the Premium or Business plans offer the best balance of speed and storage. For those focused strictly on content creation, choosing a plan optimized for hosting blog hosting ensures your site loads fast for readers.
2. A Registered Domain Name
Your domain is your digital home address. If you purchased your domain directly through Hostinger, it connects automatically. If you registered it elsewhere, you must update your domain’s nameservers to point to Hostinger.
3. Basic System Requirements
While Hostinger manages server configurations automatically, it helps to know the basic WordPress hosting requirements. Your server should run PHP version 7.4 or higher and MySQL version 5.7 (or MariaDB 10.4) to guarantee optimal site performance and security.
How to Install WordPress
Hostinger gives you two built-in paths, and there are two more if you’re installing from a different host or prefer full control over the process. We’ll go through each one, starting with the easiest.
Install WordPress via Hostinger Onboarding (Easiest for Beginners)
The Hostinger onboarding wizard is the absolute easiest way to get your website up and running. It guides you through a visual questionnaire and configures everything in the background.
1.Start the Setup Wizard:
Log in to hPanel.
Log in to your Hostinger account to access hPanel. Click the Setup button next to your pending hosting plan or navigate to the Websites tab and choose Create or migrate a website.
2.Select Your Website Type:
Choose your platform.
Select the type of website you want to build. When prompted to select a platform, click WordPress to start the WordPress one-click install process.
3.Create Your Login Credentials:
Set your admin password.
Enter your administrator email, username, and a strong password. You will use these exact credentials later to log in directly to your WordPress admin dashboard.
4.Choose Recommended Plugins:
Optional selection.
Hostinger will suggest a few basic plugins to install. You can check the ones you want or uncheck them to start with a completely clean, lightweight database.
5.Connect Your Domain:
Finalize the installation.
Choose your registered domain from the dropdown menu. If you are still testing things out, Hostinger also lets you select a temporary domain to build your site privately. Click Finish Setup and wait a few minutes for the automated system to complete the files configuration.
Install WordPress via hPanel Auto Installer
If you already skipped the initial onboarding wizard or want to add a second website to your existing hosting plan, the hPanel Auto Installer is your best option.
1.Locate the Auto Installer:
Open Website Dashboard.
Log in to hPanel, find your website, and click Manage. On the left sidebar, navigate to Website and click on Auto Installer.
2.Select WordPress:
Choose the core application.
You will see a list of popular content management systems. Click the select button on the Hostinger auto installer WordPress card.
3.Fill in Site Details:
Configure path and credentials.
Enter your website title, admin username, email, and password. If you want to install WordPress subdomain files, expand the Advanced settings section and select your desired subdomain path from the directory dropdown.
4.Configure Version and Updates:
Choose update schedules.
Click Next. Select the latest stable version of WordPress and your preferred panel language. Under the update schedule, select Update only to minor versions to prevent unexpected layout shifts from major core updates. Click Install.
How to Install WordPress Manually (For Advanced Users)
If you prefer full control over your files, or if automated installers encounter a server issue, you can perform a manual installation. This method requires downloading the core files and creating a database manually.
Step 1: Download WordPress Core Files
Go to the official WordPress.org website and download the latest core package as a .zip file to your computer.
Step 2: Upload Files via FTP or hPanel File Manager
You can upload your files using an external FTP client or use Hostinger’s built-in file browser.
- Option A (File Manager): Go to hPanel, open File Manager, and open the public_html folder. Use the upload button to select your downloaded .zip file. Once uploaded, right-click and extract the files directly into the root folder.
- Option B (FTP client): If you prefer using an external software like Filezilla, go to Files -> FTP Accounts in hPanel to retrieve your credentials. Use these details to execute an FTP WordPress upload directly into the public_html directory.
Step 3: Create a MySQL Database in Hostinger
WordPress needs a dedicated database to store your posts, settings, and user accounts.
To create a MySQL database in Hostinger, log in to hPanel, navigate to Databases, click on Management, and enter a unique database name, database username, and a strong password before clicking Create.
Once clicked, Hostinger automatically provisions the database. Keep this window open, as you will need to copy these credentials into your WordPress setup configuration wizard.
Step 4: Run the Installation Script
Open a new browser tab and visit your domain name. You will be greeted by the WordPress setup wizard:
- Select your language and click Continue.
- Enter the MySQL database name, database user, password, and database host (usually localhost) that you created in Step 3.
- Click Submit and then click Run the installation.
- Enter your site title, create your administrative login credentials, and click Install WordPress.
Comparison: Which Installation Method Should You Use?
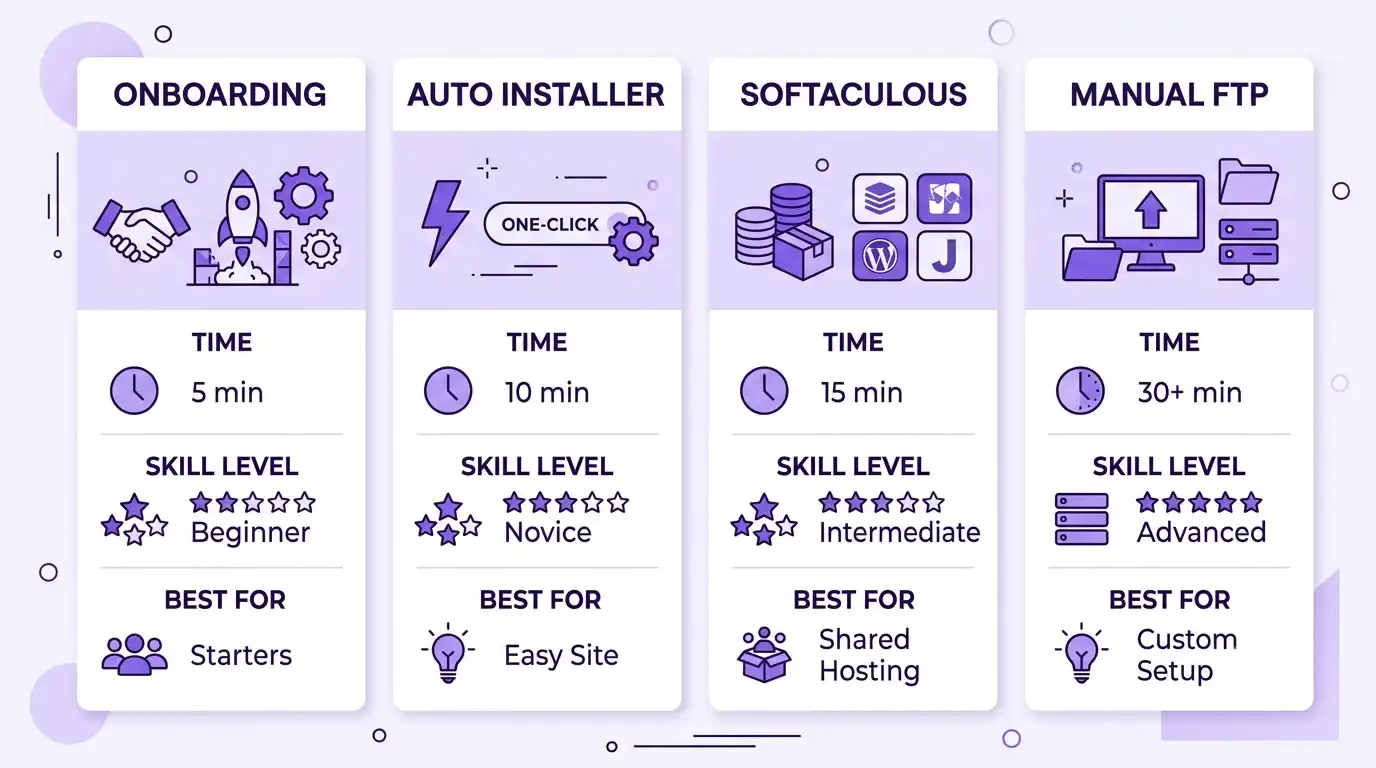
Choosing the right installation method depends on your comfort level with web files and databases.
| Method | Best For | Time to Complete | Technical Skill Required |
| Onboarding Wizard | Absolute beginners | 3 – 5 minutes | None (Fully guided) |
| Auto Installer | Subdomains & extra sites | 3 – 5 minutes | Minimal |
| Manual Installation | Advanced customization | 15 – 20 minutes | Medium (Requires FTP/Databases) |
What to Do After Installing WordPress
Installing WordPress is step one, not the finish line. A fresh install is a blank house with the utilities turned on; you still need to furnish it and lock the doors.
Set your permalinks.
Go to Settings → Permalinks in your WordPress dashboard and choose “Post name.” This gives you clean, readable URLs instead of ones full of question marks and numbers, which matters for both visitors and search engines.
Confirm your SSL is active.
Hostinger includes free SSL, but double check under Websites → SSL in hPanel that it’s issued and applied. Your site address should load with “https” and a padlock icon, not a security warning.
Pick a theme and a few essential plugins.
You don’t need forty plugins on day one. A caching plugin like LiteSpeed Cache, a security plugin, and an SEO plugin cover most of what a new site needs.
Turn on backups.
Hostinger offers automatic backups on most plans. Turn this on before you start building, not after something breaks.
Delete the default content.
WordPress ships with a sample post and page (“Hello World” and “Sample Page”). Delete both so they don’t sit around confusing visitors or search engines.
Connect your site to Google Search Console.
This step gets skipped constantly, and it shouldn’t be. Search Console tells you how Google is actually crawling your site, flags indexing errors early, and gives you a direct line to submit your sitemap. It takes five minutes and saves you weeks of guessing later.
Common WordPress Installation Problems
Even a solid setup process runs into snags sometimes. Here are the ones that come up most often, and how to fix them.
Installation stuck or not finishing. This usually means a timeout or a server hiccup. Clear your browser cache, refresh the Installed Applications page in hPanel, and try again. If it still won’t finish, contact Hostinger support chat; they can check server logs on their end that you can’t see.
500 Internal Server Error after install. This is often caused by a corrupted .htaccess file or a plugin conflict. Rename the .htaccess file in your File Manager to something like .htaccess_old, then reload your site. WordPress will regenerate a fresh one.
Can’t access wp-admin. Double check you’re using the correct URL structure (yourdomain.com/wp-admin), and confirm cookies are enabled in your browser. If you’re still locked out, resetting your password through hPanel’s WordPress management panel usually solves it.
White screen with no error message. This is almost always a plugin or theme conflict. Rename your plugins folder via File Manager to disable all plugins at once, then reactivate them one at a time to find the culprit.
Database connection error. This points to incorrect database credentials in wp-config.php, or the database service being temporarily down. You can connect to Hostinger database remotely through phpMyAdmin to check your database status and confirm the username and password match what’s in your config file. If you recently changed your database password without updating wp-config.php, this is almost always the cause, and it’s a two-minute fix once you know where to look.
Professional Web Design & Growth
If you find yourself short on time, managing a business, or simply want a highly optimized site built by industry professionals, you do not have to do it alone. Utilizing professional Web Development Services NY can take the stress out of launching and scaling your digital presence.
Our team at Local Pro 1 specializes in building fast, secure, and highly converting WordPress websites tailored specifically to your unique goals. From advanced hPanel configurations to custom theme designs and SEO optimization, we handle the technical heavy lifting so you can focus on running your business. If you are ready to take your website to the next level with a custom build, feel free to contact us today to discuss your project.
Frequently Asked Questions
Can I install WordPress on Hostinger for free?
You can install WordPress on Hostinger free of charge because the WordPress software itself is open-source. However, you still need to purchase a hosting plan and a domain name to make your website accessible on the internet.
Fortunately, most Hostinger plans include a free domain name for the first year, making the initial setup cost-effective.
How do I migrate an existing website to Hostinger?
The easiest way to move an existing site is to use Hostinger’s free website migration service. You can request a migration directly through hPanel by providing your old host’s login details, and Hostinger’s support team will transfer your entire site without any downtime.
What should I do if the installation freezes?
If your WordPress installation freezes, the best solution is to wait five minutes, clear your browser cache, and check your hPanel Websites list. Often, the installation completes successfully in the background even if the progress bar appears stuck.